We recently attended the “Generative AI Day - Building the Future” virtual event series for builders hosted by AWS on August 27 and 28. The series is great for those looking to understand AWS’s AI stack, and build AI applications and products using it. Our favorites were the session on Kiro - a spec-driven AI IDE that could be a strong alternative to Cursor - and the session on AI agent development using AgentCore which included a hands-on session to build and deploy a custom AI customer support agent. Details below.
Spec-driven development with Kiro
Kiro is an AI IDE developed by AWS, though their website feels like a snazzy new AI startup with no obvious reference to AWS. It distinguishes itself from the likes of Cursor through its “spec-driven development” approach. This approach involves building a detailed set of requirements, and design and implementation plans before generating code. This approach follows software development best practices and avoids the many iterations involved in the “vibe coding” approach in tools like Cursor, where you prompt to generate code and then have to iterate several times to get to what you want.
The interface for Kiro is similar to the Cursor IDE with the right hand side of the screen offering an interactive prompt and response space, the center displaying the text or code being reviewed, and the left side having the folder structure. The example in the demo was to build a hangman game. However instead of prompting the AI to build the game, you go through the development process in 4 stages:
-
You start with asking to get the requirements based on the prompt. You can then iterate through the requirements until you are happy with it.
-
Next, you can prompt it to generate the design document based on the requirements. This will generate an overall system design with a visual diagram and class definitions.
-
Next, you move to the implementation plan. You will be provided a set of tasks (15 in the case of the demo) that can run sequentially and generate the code for the application. It includes unit tests and references the requirements that each task satisfies.
-
Once you feel good about the implementation plan, you can ask it to execute each task. This is where it begins to generate code.
Kiro also has a few additional features such as agent hooks that look at file changes and automatically trigger an action (e.g. update documentation when code changes), and steering where you can provide coding standards used by your organization. It allows you to use MCP to bring in additional tools such as github and postgres.
We like the spec-driven development approach, though there are instances where one might just want to “vibe code” i.e. provide a prompt and get the code, rather than build an application. Kiro also has a vibe-coding option as an alternative to the spec-driven development, so you don’t have to switch between different IDEs based on your use case. While the demo didn’t cover the vibe coding feature, we expect it to be similar to a cursor like interface based on seeing the spec-driven one.
The AI model used in the backend for Kiro is Claude Code. We don’t recollect any reference to whether it can be swapped out for other models.
All in all, we loved the Kiro demo, and would love to get our hands on it. There is, however, a waitlist for access.
Build and Deploy AI Agents with AgentCore
This part hands-on session involved developing a customer services AI chatbot using Amazon Bedrock AgentCore. Amazon Bedrock is a fully managed service from AWS that allows for an easy development and deployment of generative AI applications. An alternative to Bedrock is Sagemaker AI that allows for more flexibility and control.
AWS’s technology stack for Agentic AI is as below.
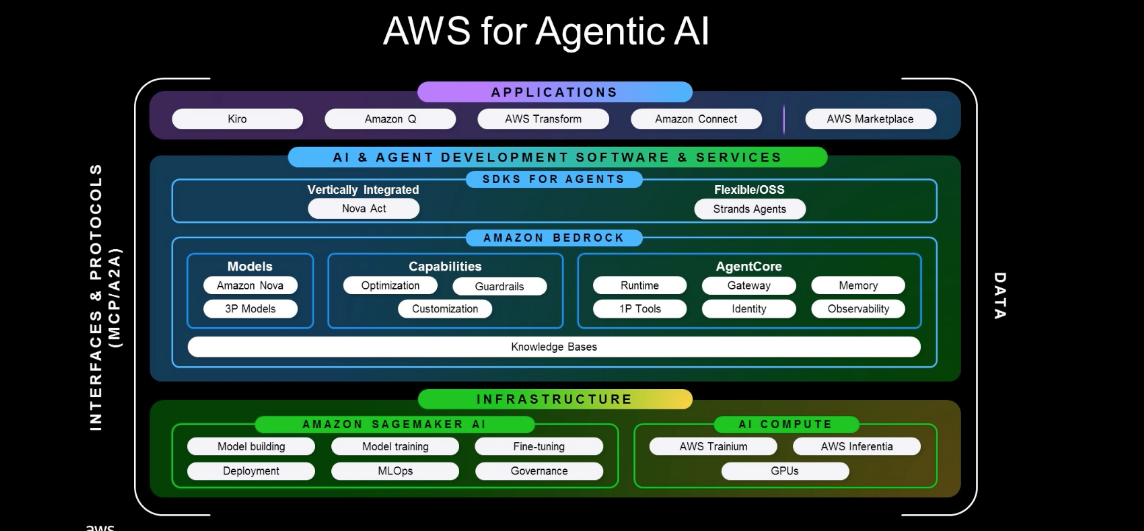
It is a bit of a maze, so we will cover this in a future post. For now, suffice it is to know that AgentCore sits within Amazon Bedrock, and offers a model-agnostic way (i.e. you can use any framework or model) to package, deploy and monitor AI agents.
The hands-on workshop covers setting up and deploying an AI agent for customer support. The model selected was Anthropic’s Claude 3.7 Sonnet.
The model is initialized as below:
from strands import Agent
from strands.models import BedrockModel

# Initialize the Bedrock model (Anthropic Claude 3.7 Sonnet)
model = BedrockModel(
    model_id="us.anthropic.claude-3-7-sonnet-20250219-v1:0",
    temperature=0.3,
    region_name=region
)
Next we specify the system prompt for the AI agent
SYSTEM_PROMPT = """You are a helpful and professional customer support assistant for an electronics e-commerce company.
Your role is to:
- Provide accurate information using the tools available to you
- Support the customer with technical information and product specifications.
- Be friendly, patient, and understanding with customers
- Always offer additional help after answering questions
- If you can't help with something, direct customers to the appropriate contact

You have access to the following tools:
1. get_return_policy() - For warranty and return policy questions
2. get_product_info() - To get information about a specific product
3. web_search() - To access current technical documentation, or for updated information.
Always use the appropriate tool to get accurate, up-to-date information rather than making assumptions about electronic products or specifications."""
The tools referenced above are provided to further aid the AI agent. As an example, the get_product_info() tool is as below, with @tool being a built-in decorator that converts the function into a tool.
from strands.tools import tool

@tool
def get_product_info(product_type: str) -> str:
    """
    Get detailed technical specifications and information for electronics products.

    Args:
        product_type: Electronics product type (e.g., 'laptops', 'smartphones', 'headphones', 'monitors')
    Returns:
        Formatted product information including warranty, features, and policies
    """
    # Mock product catalog - in real implementation, this would query a product database
    products = {
        "laptops": {
            "warranty": "1-year manufacturer warranty + optional extended coverage",
            "specs": "Intel/AMD processors, 8-32GB RAM, SSD storage, various display sizes",
            "features": "Backlit keyboards, USB-C/Thunderbolt, Wi-Fi 6, Bluetooth 5.0",
            "compatibility": "Windows 11, macOS, Linux support varies by model",
            "support": "Technical support and driver updates included"
        },
        "smartphones": {
            "warranty": "1-year manufacturer warranty",
            "specs": "5G/4G connectivity, 128GB-1TB storage, multiple camera systems",
            "features": "Wireless charging, water resistance, biometric security",
            "compatibility": "iOS/Android, carrier unlocked options available",
            "support": "Software updates and technical support included"
        },
        "headphones": {
            "warranty": "1-year manufacturer warranty",
            "specs": "Wired/wireless options, noise cancellation, 20Hz-20kHz frequency",
            "features": "Active noise cancellation, touch controls, voice assistant",
            "compatibility": "Bluetooth 5.0+, 3.5mm jack, USB-C charging",
            "support": "Firmware updates via companion app"
        },
        "monitors": {
            "warranty": "3-year manufacturer warranty",
            "specs": "4K/1440p/1080p resolutions, IPS/OLED panels, various sizes",
            "features": "HDR support, high refresh rates, adjustable stands",
            "compatibility": "HDMI, DisplayPort, USB-C inputs",
            "support": "Color calibration and technical support"
        }
    }
    product = products.get(product_type.lower())
    if not product:
        return f"Technical specifications for {product_type} not available. Please contact our technical support team for detailed product information and compatibility requirements."

    return f"Technical Information - {product_type.title()}:\n\n" \
           f"• Warranty: {product['warranty']}\n" \
           f"• Specifications: {product['specs']}\n" \
           f"• Key Features: {product['features']}\n" \
           f"• Compatibility: {product['compatibility']}\n" \
           f"• Support: {product['support']}"

print("✅ get_product_info tool ready"
We are now ready to create the customer support agent
# Create the customer support agent with all tools
agent = Agent(
    model=model,
    tools=[
        get_product_info,  # Tool 1: Simple product information lookup
        get_return_policy,  # Tool 2: Simple return policy lookup
        web_search # Tool 3: Access the web for updated information
    ],
    system_prompt=SYSTEM_PROMPT,
)
Now you can test the agent as follows
response = agent("What's the return policy for my thinkpad X1 Carbon?")For the demo, all of the code is specified in a single jupyter notebook. This demonstrates the simplicity of setting up a model and agent in Bedrock. The rest of the demo involves configuring the agent so that it can be deployed effectively and observed. We will provide a high level description, with limited code snippets for brevity
To be effective, an agent needs to manage a short-term memory of everything discussed in that session or closely related sessions. It also needs a long-term memory of prior conversations with the user that enables it to make the interactions personalized over time. Both short and long term memory capabilities are added to the agent using AgentCore Memory. We list below the relevant packages to do so, and what the updated agent specification looks like. Note that we have added a hooks parameter that references an instance of the CustomerSupportMemoryHooks class that ensures memory allocation happens automatically without manual intervention.
# Import agentCore Memory
from bedrock_agentcore.memory import MemoryClient
from bedrock_agentcore.memory.constants import StrategyType

from strands.hooks import AfterInvocationEvent, HookProvider, HookRegistry, MessageAddedEvent

import boto3
from boto3.session import Session
import uuid

SESSION_ID = str(uuid.uuid4())
memory_hooks = CustomerSupportMemoryHooks(memory_id, memory_client, CUSTOMER_ID, SESSION_ID)

# Create the customer support agent with all 5 tools
agent = Agent(
    model=model,
    hooks=[memory_hooks], # Pass Memory Hooks
    tools=[
        get_product_info,      # Tool 1: Simple product information lookup
        get_return_policy,      # Tool 2: Simple return policy lookup
        web_search,
    ],
    system_prompt=SYSTEM_PROMPT
)
AgentCore Gateway enables developers to convert the above tools and services into MCP-compatible tools. Model Control Protocol (MCP) standardizes tools and context for easy access by LLMs. AgentCore Gateway requires authentication of inbound and outbound connections. This is achieved using AgentCore Identity. In the example above, the web_search tool can be converted to an MCP so it is available to other LLMs as well.
Now, we are ready to deploy the agent to production. This is done with AgentCore Runtime that is fully managed and allows for automatic scaling and monitoring. Now the agent we have built can handle multiple concurrent user sessions, and we can log and observe system performance metrics by setting up AgentCore observability.
Finally, we need a user interface. The frontend UI is built using streamlit that you connect to the AgentCore Runtime, and generate a url that anyone can use to access the chat interface, and interact with your AI agent.
This hands-on session was a great way to both build an agent from the ground up, and understand the capabilities offered by Amazon Bedrock AgentCore.
Amazon Nova and Amazon Sagemaker AI
AWS offers two platforms for building and deploying AI - Bedrock and Sagemaker. They recommend Bedrock if you don’t have a lot of labeled data, lack expertise to do too many optimizations, lack time/resources, or don’t intend to finetune your models. We saw an example of deploying an AI customer support agent using Bedrock and AgentCore in the earlier session. It does take some set-up and configuration, though it is relatively straightforward and one can make use of a lot of template code. Sagemaker, on the other hand, allows for more flexibility with customization, provides more knobs (i.e. parameters) to tweak, and allows you to leverage more data to fine tune and continuously improve the model. The focus of this session was on Sagemaker AI. This session walked us through different ways to customize a model using concepts we have discussed in prior posts - Supervised Fine Tuning (SFT), Direct Preference Optimization (DPO) and Reinforcement Learning (RL).
The demo starts with Amazon Nova with the option to train it using a set of recipes. One can, for example, choose between SFT-LoRA, SFT-full, DPO-LoRA and DPO-full. You can further choose Rewards based Reinforcement Learning (PPO) for alignment, and continued pre-training that allows you to use unlabeled data and improve model performance on task-specific tasks. You can run these training jobs on SageMaker training jobs (SMTJ) or on SageMaker HyperPod (SMHP). This will create a jupyter notebook with pre-filled code blocks and boilerplate code. It allows you to specify the input data sources and location where you want to store the output, and also set-up validation using a validation dataset. Once you kick-off training, the training logs can be monitored on SageMaker studio where you can, for e.g. look at learning curves and evaluate validation and test performance. This is an iterative process until you get to a model that meets your performance requirements. Once you finalize your model, you can import the model into Bedrock i.e. take the custom model in the S3 location and move it to Bedrock. This can take up to 20-25 minutes. You then create a custom model deployment for on-demand inference.
Automated Reasoning Checks in Guardrails
AWS offers the ability to ingest policy documents, and translate them into logical rules that are then applied to both user inputs and AI agent responses. The example provided was of a financial services chatbot, where a user can ask about their loan eligibility (e.g. can I get a loan with a 550 credit score), and the AI agent response will check against the logical rules in policy and respond accordingly, as opposed to providing a potentially incorrect response (e.g. saying they are eligible, when they are not). The guardrails can also be tested using a set-up where one can provide test queries and responses and have it evaluate the response for accuracy.
Resources